Using a Chatter V1 with Meshtastic
I recently discovered the Meshtastic project while looking for a way to mesh devices for a project I’m doing with a friend and got a few nodes to play around and eventually add a node to the network.
Totally randomly, at about the same time, I was gifted a pair of CircuitMess Chatter V1.0. It is a nice Lora Messaging device kit with a really cool software that allow exchanging encrypted messages with paired devices.
The obvious thing to do here is to try to port Meshtatic to the Chatter, the icing on the cake being making it possible to use the integrated keypad to type messages.
Side project warning: Yeah ! One more side project ! 🥳
First investigations
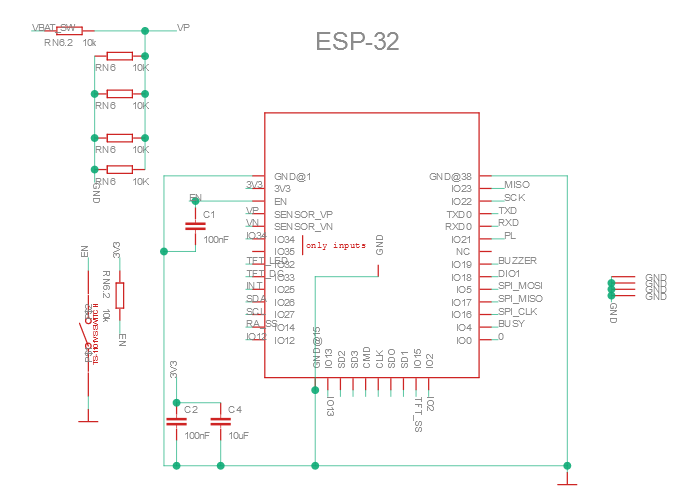
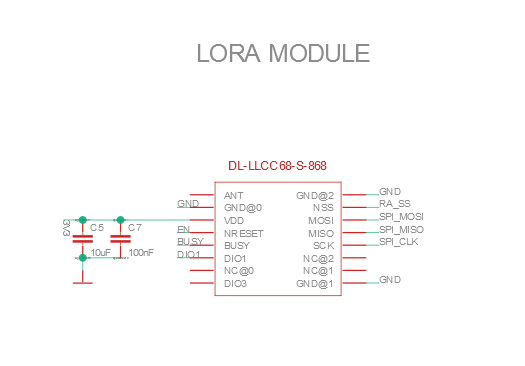
The Meshtastic nodes I purchased (Heltec HTIT-Tracker and Wireless Stick Lite) have a rather simple architecture, an ESP32S3 runs the Meshtatic firmware and a SX1262 handles the RF part (for the Stick Lite).
At first glance, the Chatters have a similar architecture with an ESP32 WROOM and a HOPERF Lora module.
Someone even already ported meshtastic to the Chatter V2 but I have the V1 so let’s see what are the differences between the two versions and how much work is left to do !
Since the Chatters are intented as educationnal devices, their FW is available on CircuitMess Github and, even better, the schematics are also published in CircuitMess forums.
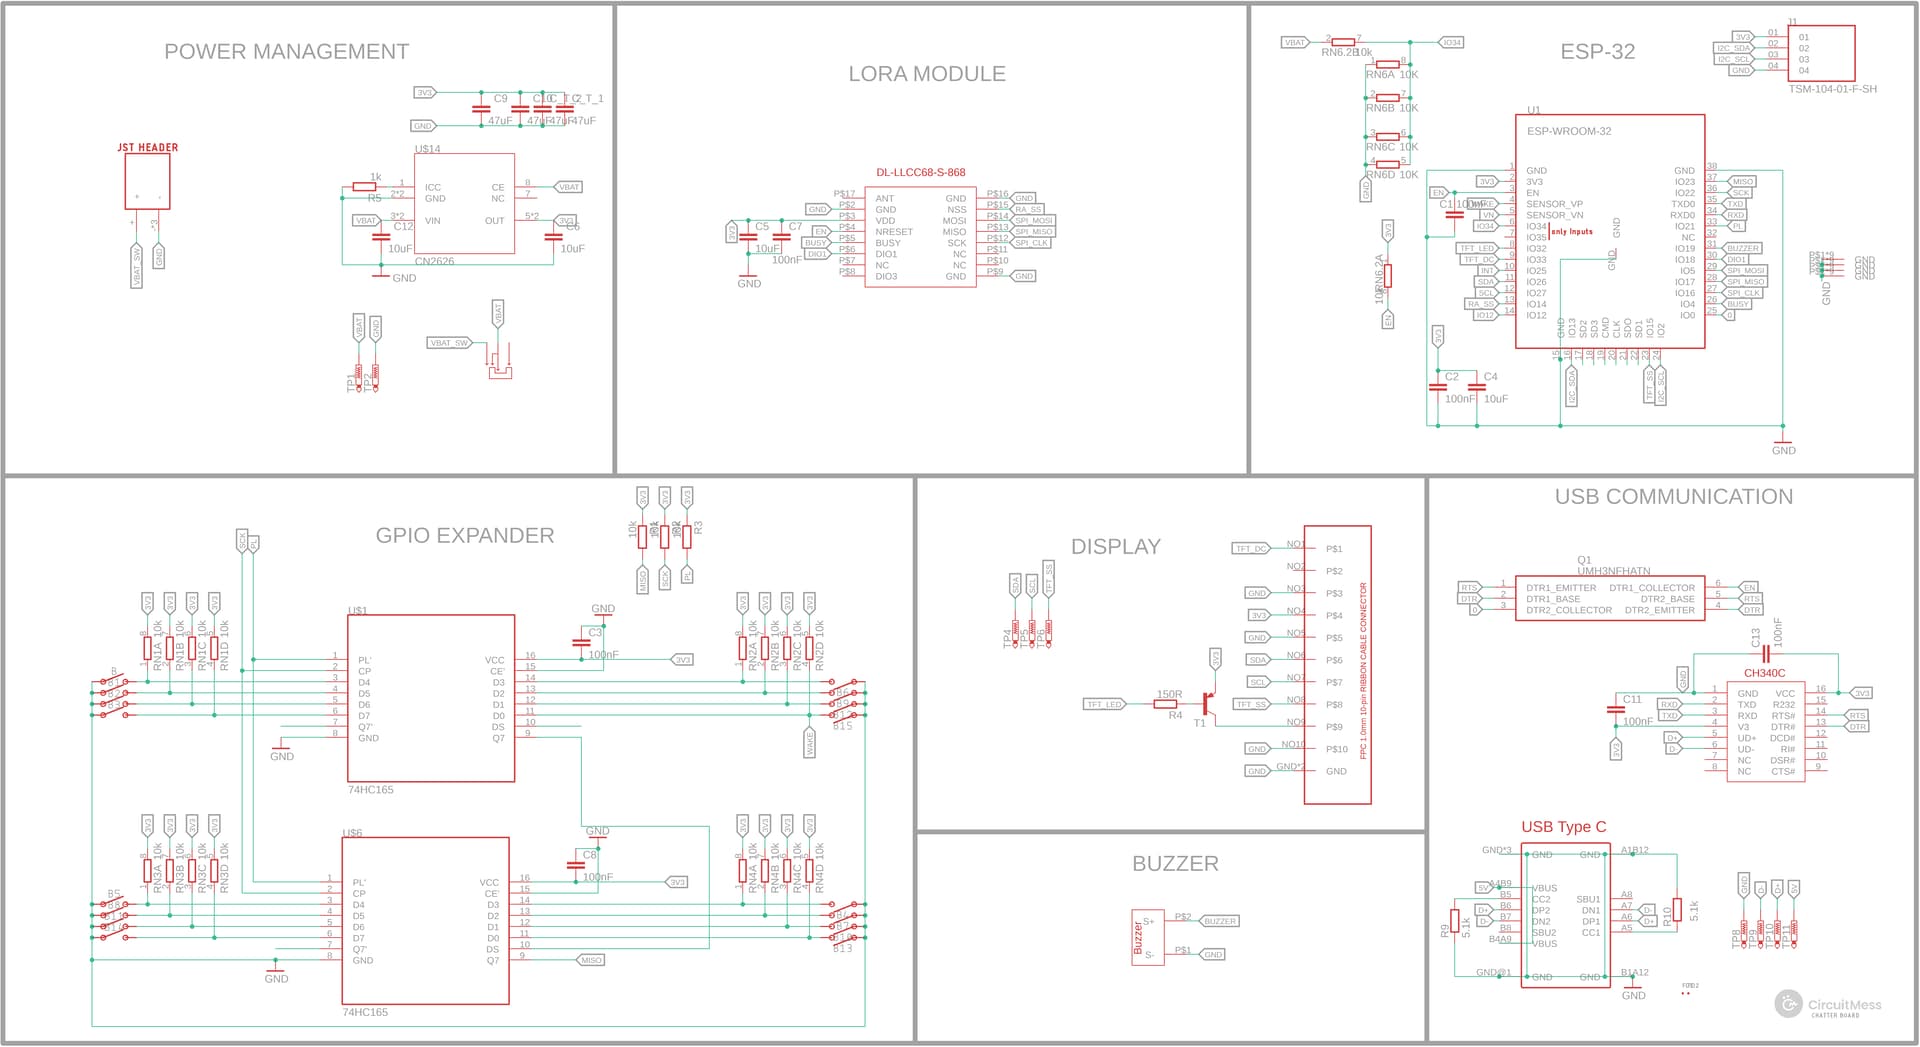
The chatter V1.0 schematics are only available as an Eagle .sch file for some weird reason
Both Chatter V1.0 and V2.0 uses the same ESP32-WROM-32 module and DL-LLCC68-S-868 Lora module, and there doesn't seem to be any significant differences in the schematics so using Chatter V2.0 official Meshtastic firmware might just works !
On Github, the firmware author helpfully warned me that it with the cheap stock Lora module, I wouldn’t be able to use all the the Meshtastic channels and specifically the Long-Fast one but that already seemed quite promising !
Trying to flash the Meshtastic Chatter V2.0 firmware on Chatter V1.0
After installing the required software to flash Meshtastic to a compatible board, things are looking good, the Chatter V1.0 is detected :
$ esptool chip_id
esptool.py v4.7.0
Found 1 serial ports
Serial port COM16
Connecting....
Detecting chip type... Unsupported detection protocol, switching and trying again...
Connecting....
Detecting chip type... ESP32
Chip is ESP32-D0WDQ6 (revision v1.0)
Features: WiFi, BT, Dual Core, 240MHz, VRef calibration in efuse, Coding Scheme None
Crystal is 40MHz
MAC: b0:b2:1c:45:0a:4c
Uploading stub...
Running stub...
Stub running...
Warning: ESP32 has no Chip ID. Reading MAC instead.
MAC: b0:b2:1c:45:0a:4c
Hard resetting via RTS pin...
Flashing the latest firmware using the bat file is “almost” uneventful (As you can see from the panicked Ctrl+C):
$ ./device-install.bat -f firmware-chatter2-2.3.10.d19607b.bin
Trying to flash update firmware-chatter2-2.3.10.d19607b.bin, but first erasing and writing system information"
esptool.py v4.7.0
Found 1 serial ports
Serial port COM16
Connecting....
Detecting chip type... Unsupported detection protocol, switching and trying again...
Connecting......
Detecting chip type...

Traceback (most recent call last):
  File "C:\Python39\lib\runpy.py", line 197, in _run_module_as_main
    return _run_code(code, main_globals, None,
  File "C:\Python39\lib\runpy.py", line 87, in _run_code
    exec(code, run_globals)
  File "C:\Python39\lib\site-packages\esptool\__main__.py", line 9, in <module>
    esptool._main()
  File "C:\Python39\lib\site-packages\esptool\__init__.py", line 1139, in _main
    main()
  File "C:\Python39\lib\site-packages\esptool\__init__.py", line 923, in main
    operation_func(esp, args)
  File "C:\Python39\lib\site-packages\esptool\cmds.py", line 1070, in erase_flash
    esp.erase_flash()
  File "C:\Python39\lib\site-packages\esptool\loader.py", line 131, in inner
    return func(*args, **kwargs)
  File "C:\Python39\lib\site-packages\esptool\loader.py", line 1138, in erase_flash
    self.check_command(
  File "C:\Python39\lib\site-packages\esptool\loader.py", line 467, in check_command
    val, data = self.command(op, data, chk, timeout=timeout)
  File "C:\Python39\lib\site-packages\esptool\loader.py", line 436, in command
    p = self.read()
  File "C:\Python39\lib\site-packages\esptool\loader.py", line 369, in read
    return next(self._slip_reader)
  File "C:\Python39\lib\site-packages\esptool\loader.py", line 1553, in slip_reader
    read_bytes = port.read(1 if waiting == 0 else waiting)
  File "C:\Python39\lib\site-packages\serial\serialwin32.py", line 288, in read
    result_ok = win32.GetOverlappedResult(
KeyboardInterrupt
 ESP32
Chip is ESP32-D0WDQ6 (revision v1.0)
Features: WiFi, BT, Dual Core, 240MHz, VRef calibration in efuse, Coding Scheme None
Crystal is 40MHz
MAC: b0:b2:1c:45:0a:4c
Uploading stub...
Running stub...
Stub running...
Erasing flash (this may take a while)...
^Cesptool.py v4.7.0
Found 1 serial ports
Serial port COM16
Connecting....
Detecting chip type... Unsupported detection protocol, switching and trying again...
Connecting....
Detecting chip type... ESP32
Chip is ESP32-D0WDQ6 (revision v1.0)
Features: WiFi, BT, Dual Core, 240MHz, VRef calibration in efuse, Coding Scheme None
Crystal is 40MHz
MAC: b0:b2:1c:45:0a:4c
Uploading stub...
Running stub...
Stub running...
Configuring flash size...
Flash will be erased from 0x00000000 to 0x00214fff...
Compressed 2181712 bytes to 1275479...
Writing at 0x00000000... (1 %)
...
...
...
Writing at 0x0020fadb... (100 %)
Wrote 2181712 bytes (1275479 compressed) at 0x00000000 in 111.7 seconds (effective 156.3 kbit/s)...
Hash of data verified.

Leaving...
Hard resetting via RTS pin...
esptool.py v4.7.0
Found 1 serial ports
Serial port COM16
Connecting....
Detecting chip type... Unsupported detection protocol, switching and trying again...
Connecting.....
Detecting chip type... ESP32
Chip is ESP32-D0WDQ6 (revision v1.0)
Features: WiFi, BT, Dual Core, 240MHz, VRef calibration in efuse, Coding Scheme None
Crystal is 40MHz
MAC: b0:b2:1c:45:0a:4c
Uploading stub...
Running stub...
Stub running...
Configuring flash size...
Flash will be erased from 0x00260000 to 0x00300fff...
Compressed 657968 bytes to 399991...
Writing at 0x00260000... (4 %)
...
...
...
Writing at 0x002fe423... (100 %)
Wrote 657968 bytes (399991 compressed) at 0x00260000 in 35.1 seconds (effective 150.0 kbit/s)...
Hash of data verified.

Leaving...
Hard resetting via RTS pin...
Terminate batch job (Y/N)? Y
Y
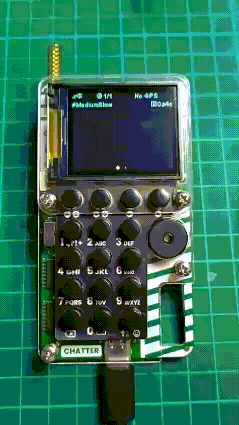
After the initial configuration, it does works in Medium-Slow as you can see from the picture below :
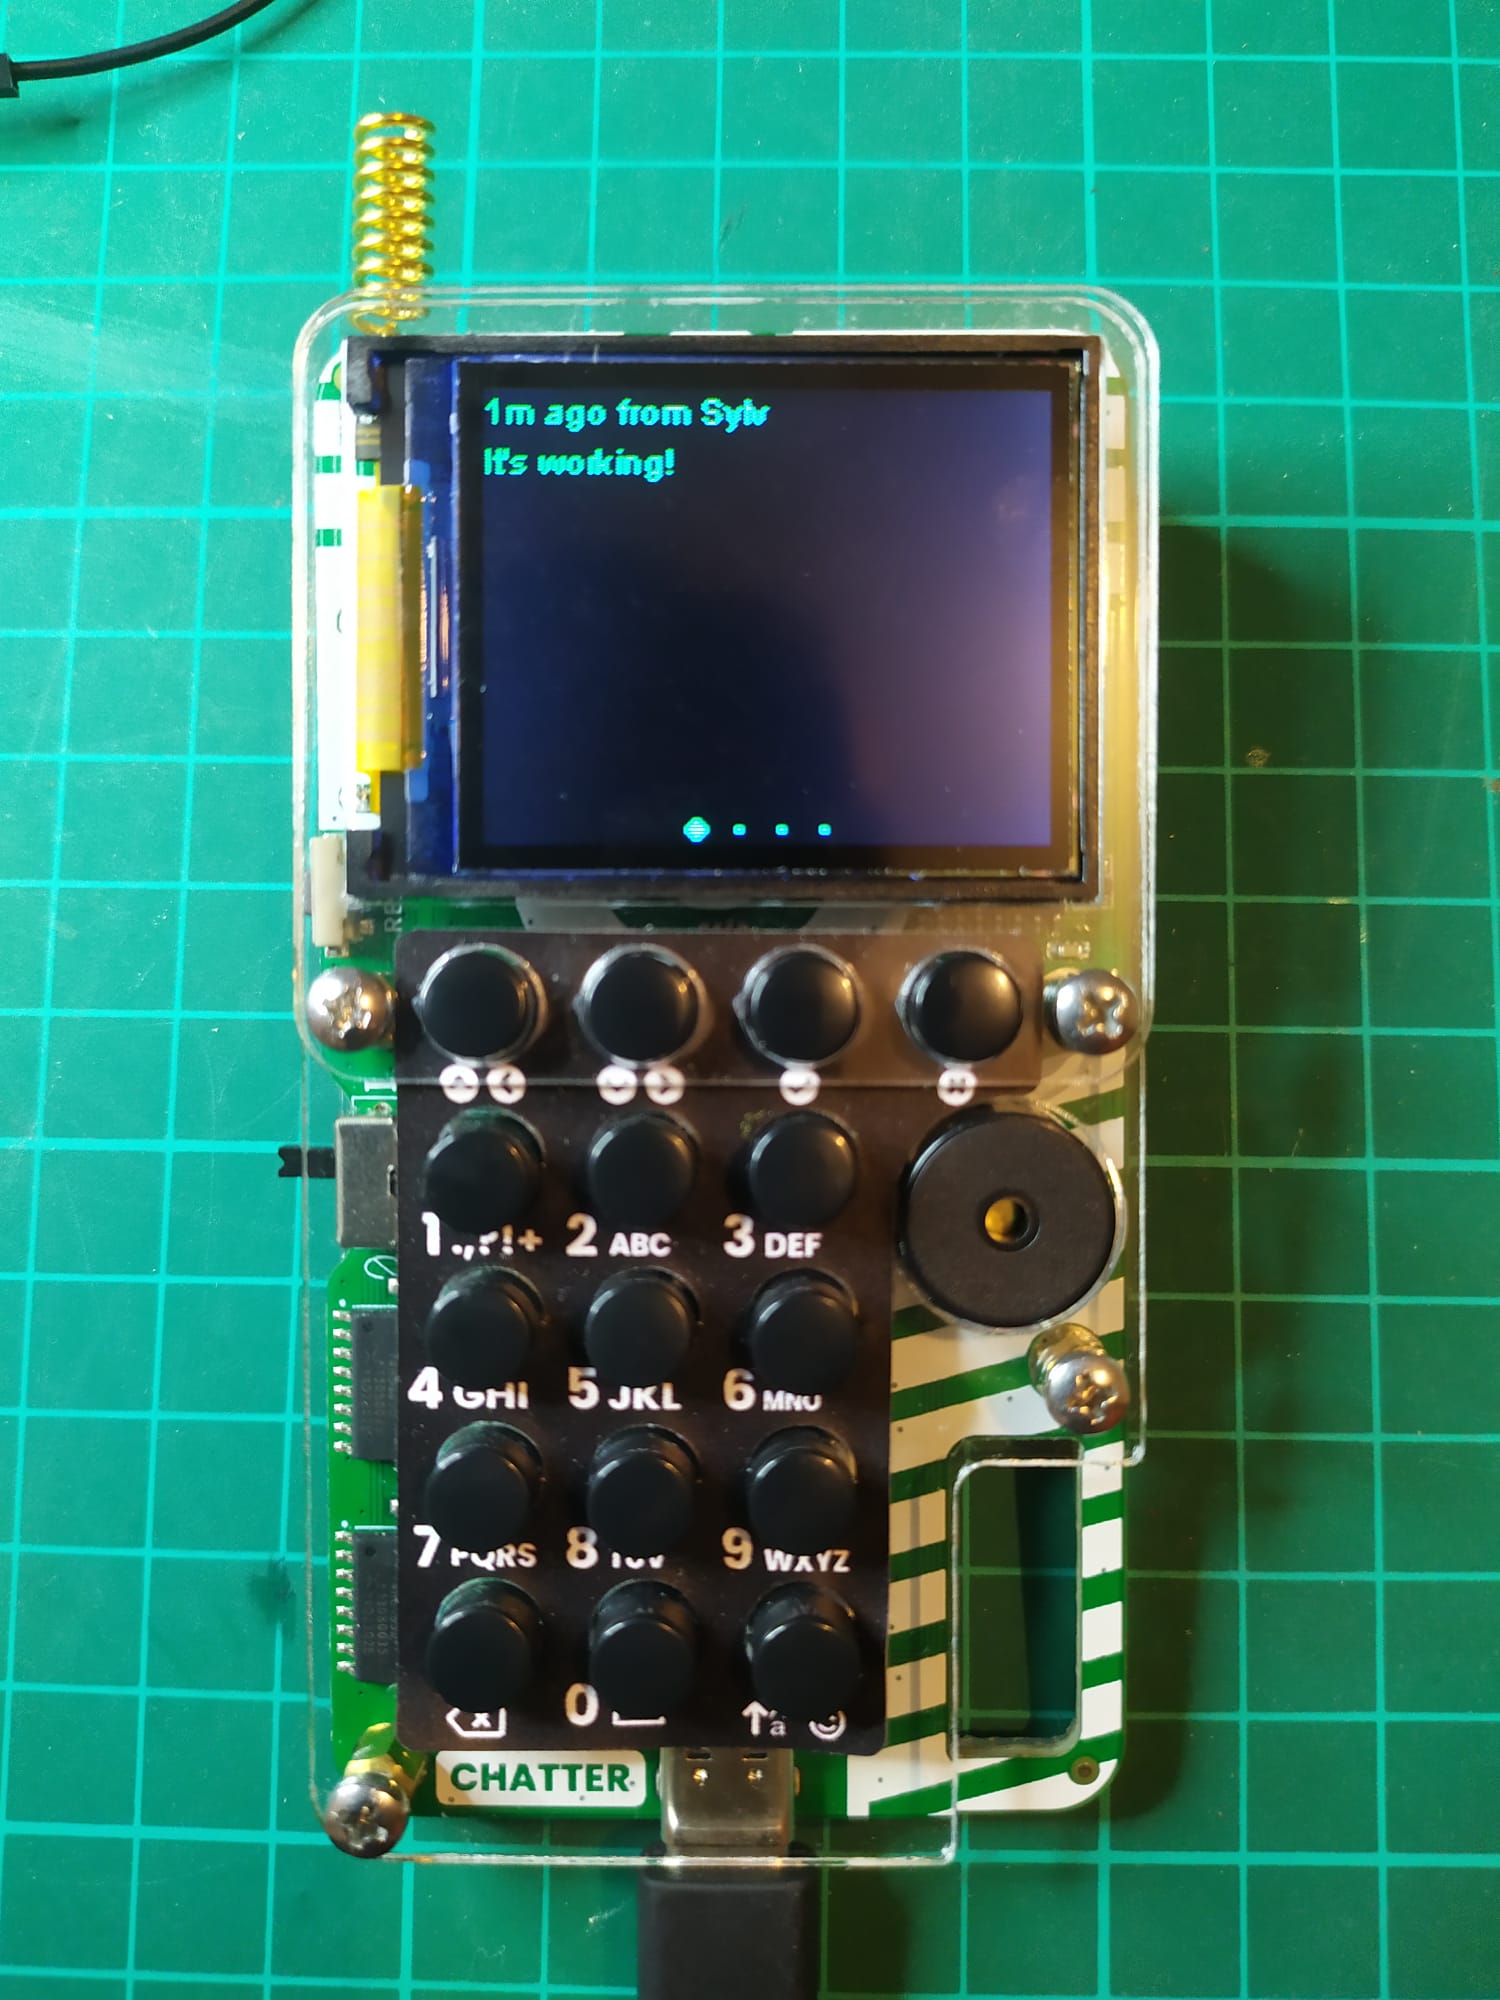

It’s awesome !
Using the embedded keyboard
Since Meshtastic was actually working out of the box, 😀, this project was begging for keypad support !
I originally though of using the Meshtastic API and write a core module that could interpret the keypad input but after digging a little bit more, there is already a built in integrated keyboard support !
I “just“ need to add support for the Chatter keyboard.

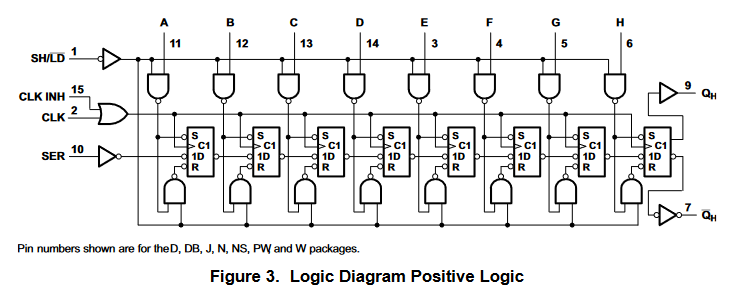
Yes, again, it’s basically the same schematic as Chatter V2.0 and it uses the same 74HC165 shift registers which is good, we’ll be able to support both devices with the same firmware !
The wake button
GPSFan, the author of Chatter’s Meshtastic port said he got one button on the keypad to work as the user button.

This button didn’t work for me with the latest firmware, since GPSFan mentions software mods, I went to check on Github if those tweaks made it to the PR.
The changes list was quite small and provided an easy entry point in the Meshtastic codebase.
This line in the variant.h file does register a button connected the the pin 36 as the wake button:
#define BUTTON_PIN 36 // Use the WAKE button as the user buttonAnd indeed, on Chatter V2.0, this pin is connected to a wake button
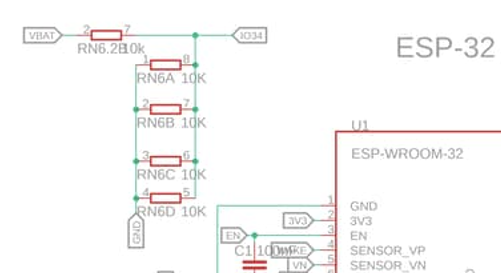
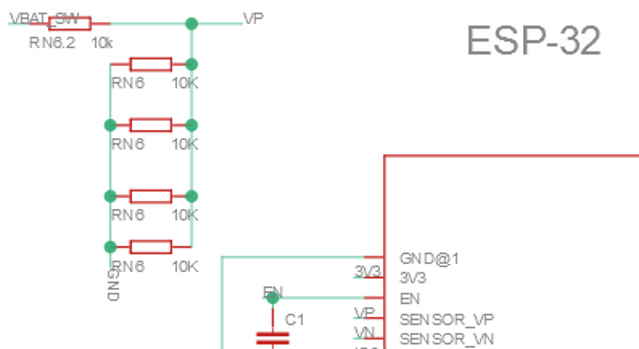
This is where we find the first difference in the schematics because on Chatter V1.0, this pin is connected to the battery voltage sensor:
It is easily patchable by cutting the trace and running a wire to this button but maybe, if we manage to get the keypad working, we can avoid resorting to that.
Having the battery voltage monitored is nice, especially since, if I can manage to get the keypad working, I’ll certainly try to power it with a rechargeable battery.
So let’s not investigate further this Wake button topic for now.
The full keypad
From Meshtastic documentation on keyboards shift-register based keypad are not natively supported:

But they state they want to add more input methods in the future … is the futur now ? 😁
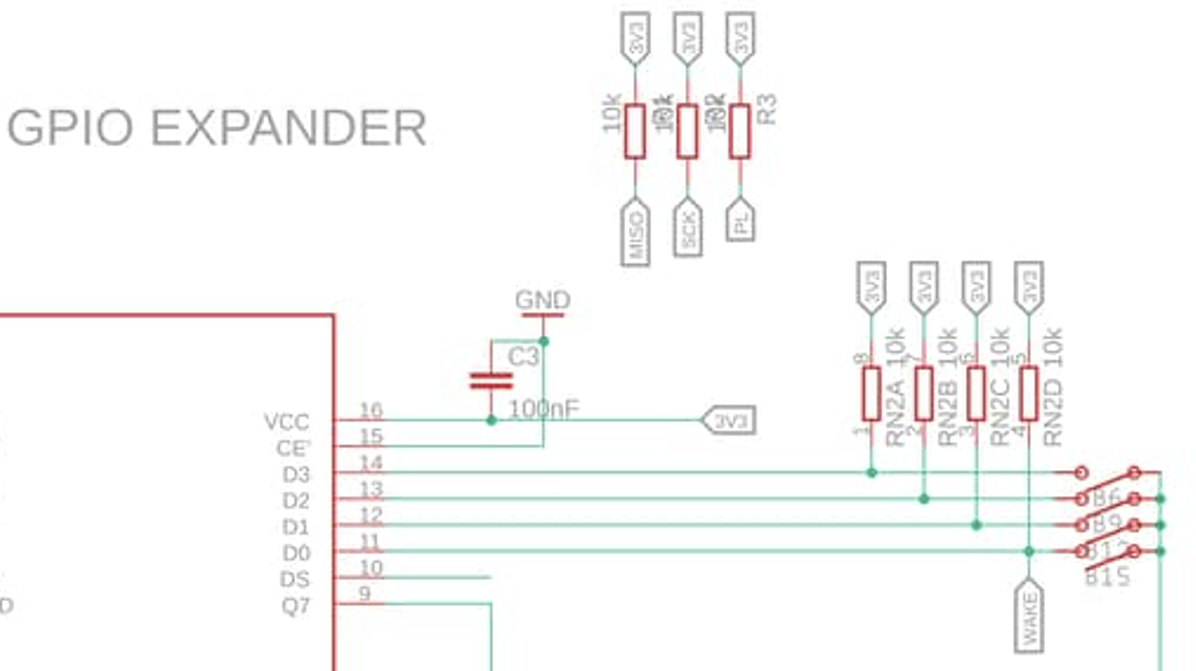
The Chatter keypad is based on two 74HC165 shift registers, they are PISO (Parrallel In, Serial Out) shift registers, and they support chaining, which means we should be able to read the keypad state by shifting bytes on just one serial port.
The serial port is connected on GPIO23 & GPIO22 on both Chatter V1.0 and Chatter V2.0 so again, one firmware would be able to support both devices !
Meshtastic support for on-device message input is called the canned message module because it originally only support sending prerecorded messages using only few buttons (UP, DOWN, OK for example) but looking through Meshtastic code, it seemed to have been extended to support free text messages, there seem to already be some support for Matrix based keyboards.
The 74HC165 datasheet is really straightforward, only three wires are necessary to read the inputs state, one LOAD signal will trigger a read of the 74H165 from its input pins to its internal buffer.
We can then read this internal buffer with two more signals, one CLOCK signal and one DATA signal, each clock cycle putting one more bit corresponding to the input state of the next pin on the LOAD signal edge.
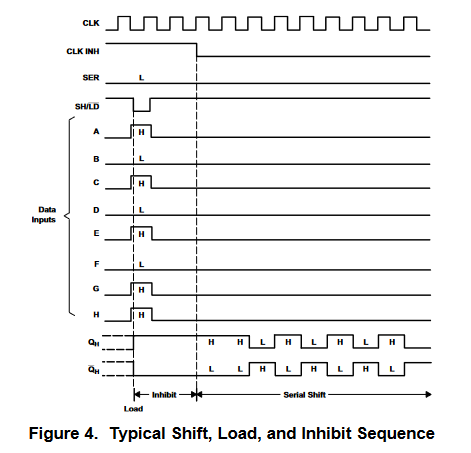
Depending on the surrounding circuitry, for example if the shift register is used in a context where a suitable clock is readily available and computational power is scarce (combinatory logic only circuitry), a clock inhibit signal can be used to mask the clock signal.
An inverted output is also present in case this shift register is directly wired to some other logic chip, to spare an inverting gate.
In our case, with the shift register directly wired into the ESP32 and plenty of computational power to waste, the clock inhibit is pulled low and we will just generate the clock using a GPIO when needed.
We can also see that in our case, two shift register are chained with the SER pin in the datasheet or the DS pin in Chatter’s schematics.
Given the internal logic diagram, this mean we should be able to read all 16 inputs of both shift register by just clocking 16 times and reading the Q pin !
Meshtastic code is rather well structured and it was easy to find where the similar code for input devices is located :
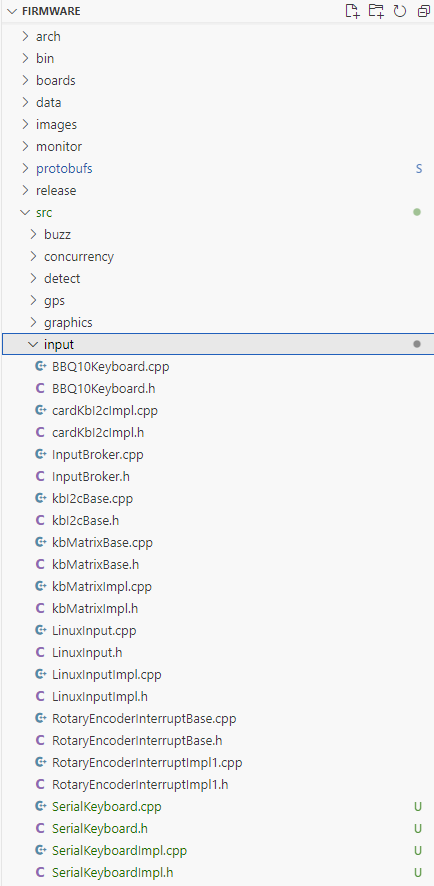
Using kbMatrix and LinuxInput as a model, we can add support for the serial keyboards.
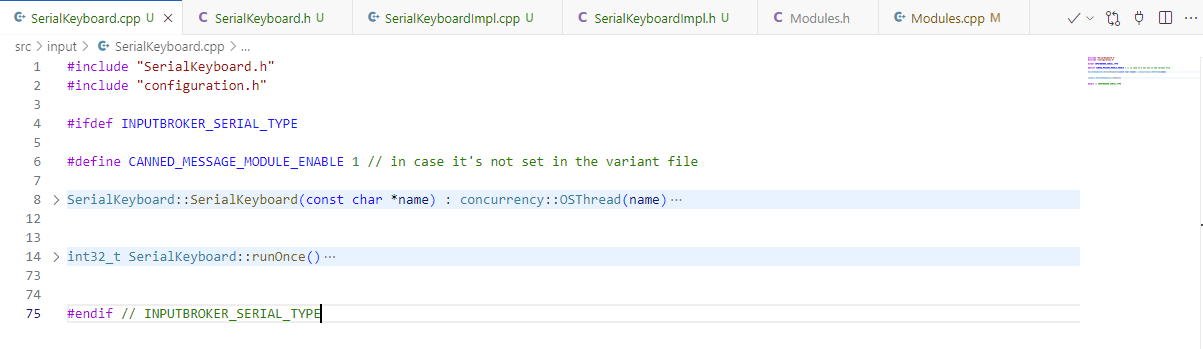
Copy pasting and renaming everything in the kbMatrix files, we can see that most of the logic is in the runOnce function. This function is called periodically by the RTOS scheduling Meshtastic tasks.
int32_t SerialKeyboard::runOnce()
{
    if (!INPUTBROKER_SERIAL_TYPE) {
        // Input device is not requested.
        return disable();
    }

    if (firstTime) {
        // This is the first time the OSThread library has called this function, so do port setup
        firstTime = 0;
        pinMode(KB_LOAD, OUTPUT);
        pinMode(KB_CLK, OUTPUT);
        pinMode(KB_DATA, INPUT);
        digitalWrite(KB_LOAD, HIGH);
        digitalWrite(KB_CLK, LOW);
        LOG_DEBUG("Serial Keyboard setup\n");
    }

    key = 0;

    if (INPUTBROKER_SERIAL_TYPE == 1) { //Chatter V1.0 & V2.0 keypads
        // scan for keypresses
        // Write pulse to load pin
        digitalWrite(KB_LOAD, LOW);
        delayMicroseconds(5);
        digitalWrite(KB_LOAD, HIGH);
        delayMicroseconds(5);

        // Get data from 74HC165
        byte incoming1 = shiftIn(KB_DATA, KB_CLK, LSBFIRST);
        byte incoming2 = shiftIn(KB_DATA, KB_CLK, LSBFIRST);

        // Print to serial monitor
        Serial.print (incoming1, BIN);
        Serial.println (incoming2, BIN);

     }
    return 50; // call back this function in 50ms
}
With this code, we can see in real time which button is being pressed in the serial console.
1111111111111111 // no buttons are being pressed
1011111111111111 // the button connected to the first 74HC165 second input is being pressed
.....
This is great !
At this point, I figure it’s time to start a pull request to get some feedback on the coding style, variable names, structures, … since this is my first contribution to this project and I’m not sure of the established best practice.
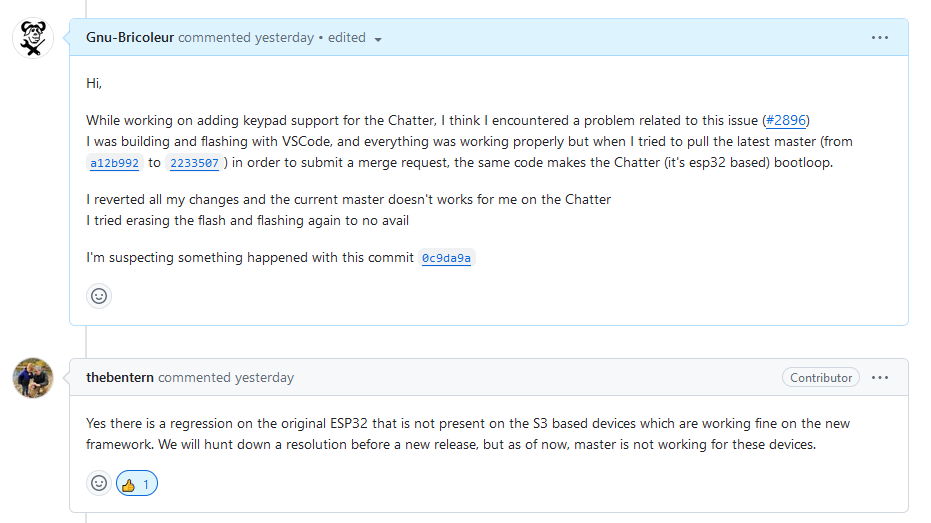
Two days passed since I first pulled the code and started experimenting so I pull the latest master, rebase my code and …. patatra, nothing works anymore, the code still compiles but once flashed to the ESP32, it bootloops.
I start trying to clone the project anew, reinstalling the dependencies, erasing the ESP32 flash, nothing work. Every time I flash the ESP32 using the project in its former state it works and after the update it doesn’t.
I start questioning the latest master, commenting in a seemingly related issue on Github, and as luck would have it, a breaking change was introduced in between my first code pull and my tentative to open a merge request. Thankfully, it was quickly acknowledged by a contributor !
I’ll worry with the merge request later and keep on coding for now !
Meshtastic uses InputEventChar codes to differentiate between keypresses.
So let’s list our keypad buttons, their corresponding pin numbers and the InputEventChar we want to associate to them. Since Chatter keypad is based on the T9 layout, we want to attribute a different InputEventChar to a keypress depending on how many times it’s already been pressed in the near past.
Button | Button number | Shift register pin number | First Press | Second Press | Third press | Fourth press |
|---|---|---|---|---|---|---|
UP/LEFT | #2 pin 3 | UP | ||||
DOWN/RIGHT | #2 pin 2 | DOWN | ||||
OK | #2 pin 1 | SELECT | ||||
CANCEL | #2 pin 0 | CANCEL | ||||
1.,?!+ | 0 | #1 pin 4 | ||||
2abc | 1 | #1 pin 3 | ||||
3def | 2 | #2 pin 4 | ||||
4ghi | 3 | #1 pin 5 | ||||
5jkl | 4 | #1 pin 2 | ||||
6mno | 5 | #2 pin 5 | ||||
7pqrs | 6 | #1 pin 6 | ||||
8tuv | 7 | #1 pin 1 | ||||
9wxyz | 8 | #2 pin 6 | ||||
BACK | #1 pin 7 | |||||
0/SPACE | 9 | #1 pin 0 | ||||
SHIFT | 10 | #2 pin 7 |
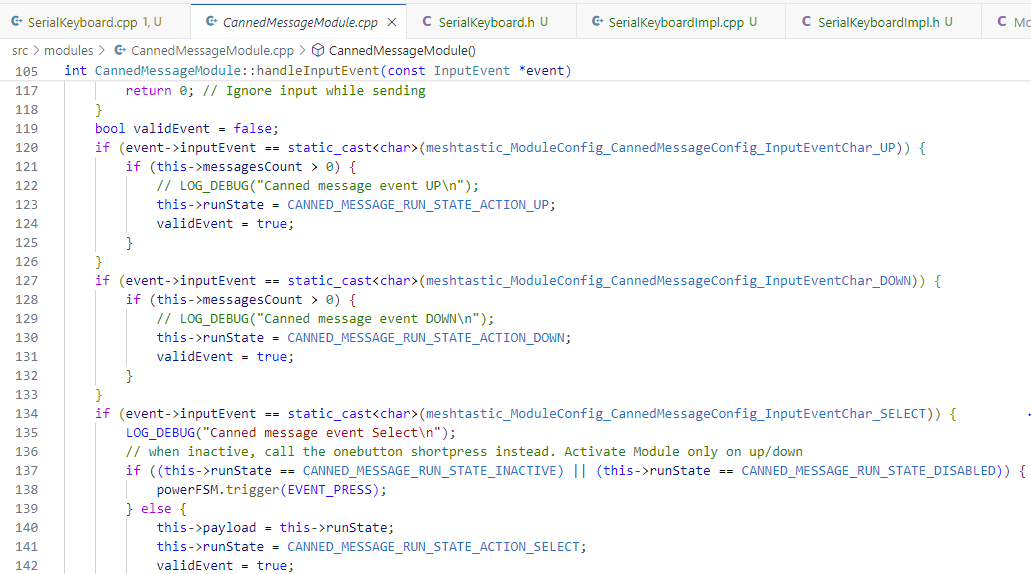
Then using this code, we can use the shift register readings to trigger a CannedMessageConfig event.
InputEvent e;
e.inputEvent = meshtastic_ModuleConfig_CannedMessageConfig_InputEventChar_NONE;
e.source = this->_originName;

if (!(shiftRegister2 & (1 << 3))) {
  e.inputEvent = meshtastic_ModuleConfig_CannedMessageConfig_InputEventChar_LEFT;
}
else if (!(shiftRegister2 & (1 << 2))) {
  e.inputEvent = meshtastic_ModuleConfig_CannedMessageConfig_InputEventChar_RIGHT;
}
else if (!(shiftRegister2 & (1 << 1))) {
  e.inputEvent = meshtastic_ModuleConfig_CannedMessageConfig_InputEventChar_SELECT;
}
else if (!(shiftRegister2 & (1 << 0))) {
  e.inputEvent = meshtastic_ModuleConfig_CannedMessageConfig_InputEventChar_CANCEL;
}

 if (e.inputEvent != meshtastic_ModuleConfig_CannedMessageConfig_InputEventChar_NONE) {
  this->notifyObservers(&e);
}
It does work but lacks debouncing and for some reason canned messages doesn’t seem available on my device.
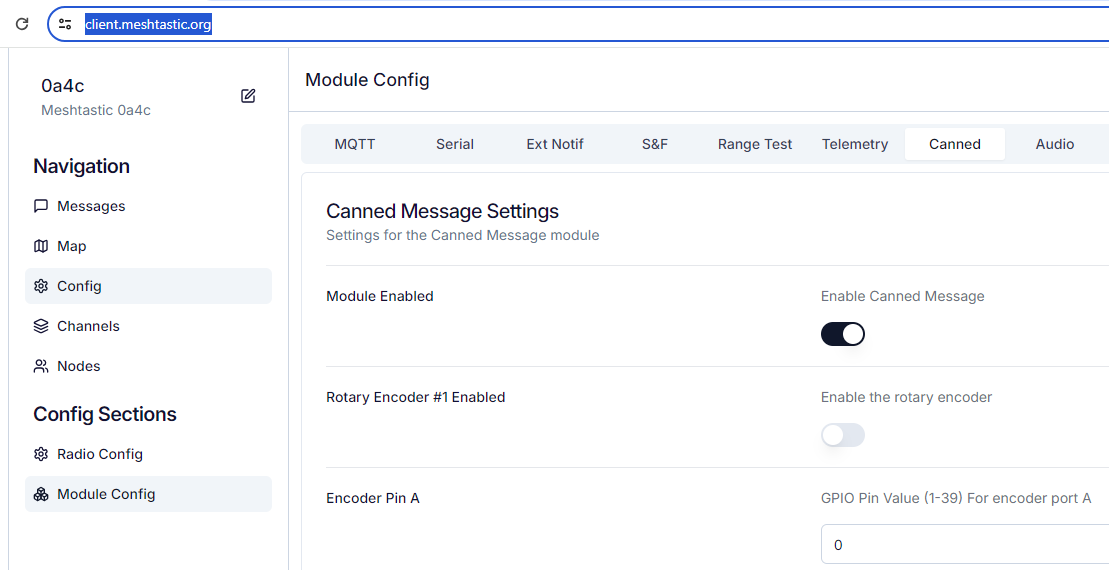
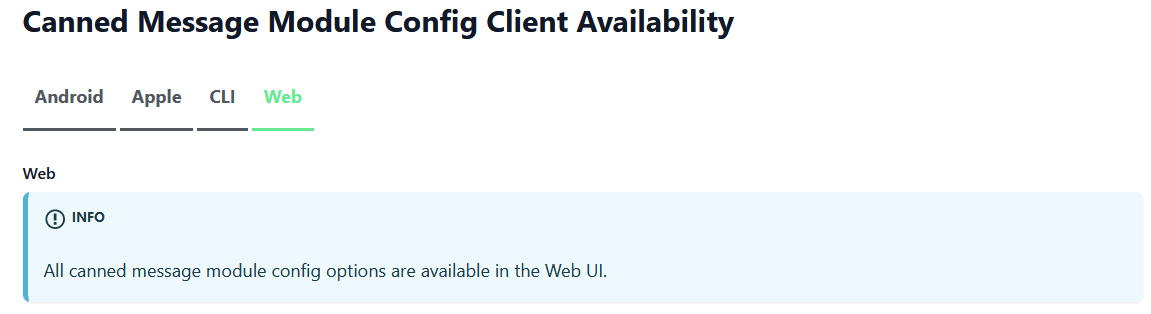
Using the web configuration interface, https://client.meshtastic.org/, we can enable the canned messages but the canned message menu doesn’t shows up on the home screen menu.
In the device logs, there is this line :
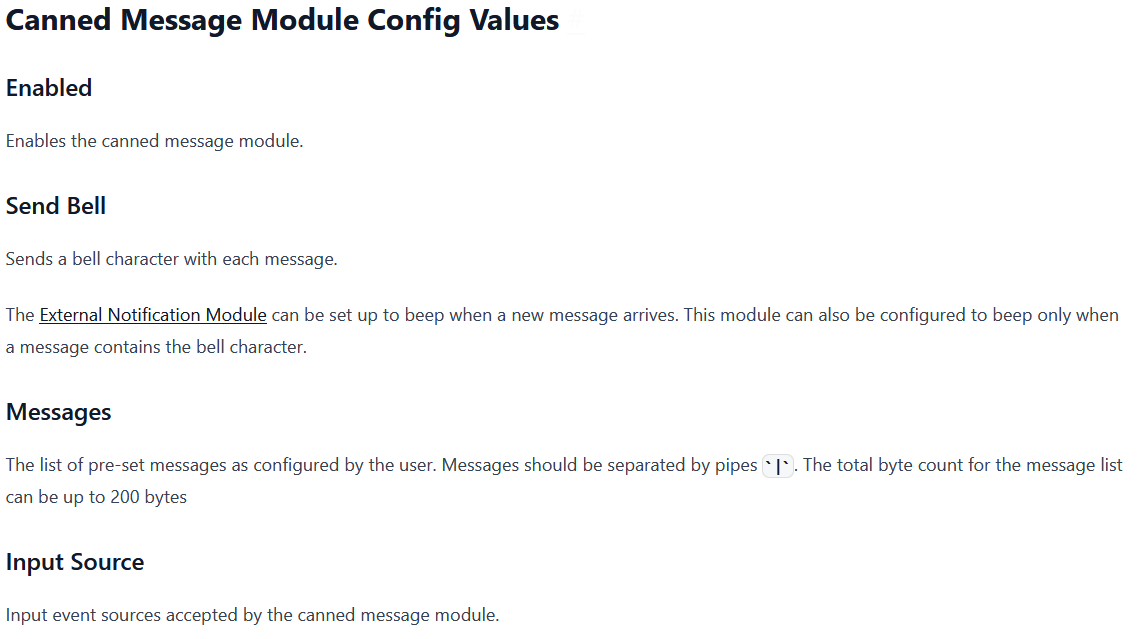
CannedMessageModule: No messages are configured. Module is disabledAnd indeed we didn’t configure any messages !
On the other hand we didn’t really got the opportunity. Digging a bit more in the web configuration UI, the option is simply not available.
I am not the first to find this discrepancy, and, it turns out there is already a Github issue filed for this problem.
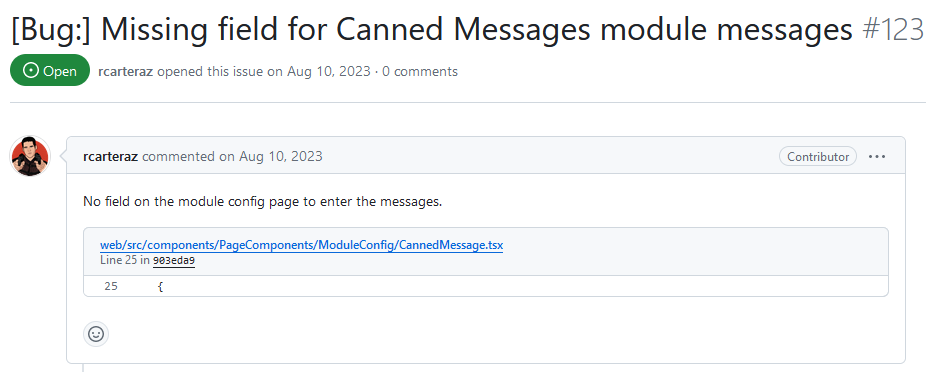
Sadly, this doesn’t seem to have been fixed since the issue is obviously still here.
Now we could use the android app, or the python CLI but let’s try to fix this issue!
Yeah, a side-side project ! 🫠
The Meshtastic web configuration UI is in another Github repository, after cloning it, installing node js, pnpm, and the dependencies, running it is as straightforward as :
pnpm devIt launches a webserver and starts serving the Meshtastic configuration UI on it.
Searching the repo for “canned messages“ related code, 4 files are returned :
src/validation/moduleConfig/cannedMessage.ts
src/components/PageComponents/ModuleConfig/CannedMessage.tsx
src/pages/Config/ModuleConfig.ts
src/core/stores/deviceStore.ts
I am by no means a web developper so after reading the 4 files, only the first 2 seems to be relevant to our problem.
Adding the missing fields to the two first files is trivial and…. it is not enough (or wasn’t done properly, again, not a web dev).
Since I don’t want to get swamped in an another unrelated side project, let’s abandon the matter for now. 🙃
End (for now) of the side-side project ! That was quick !
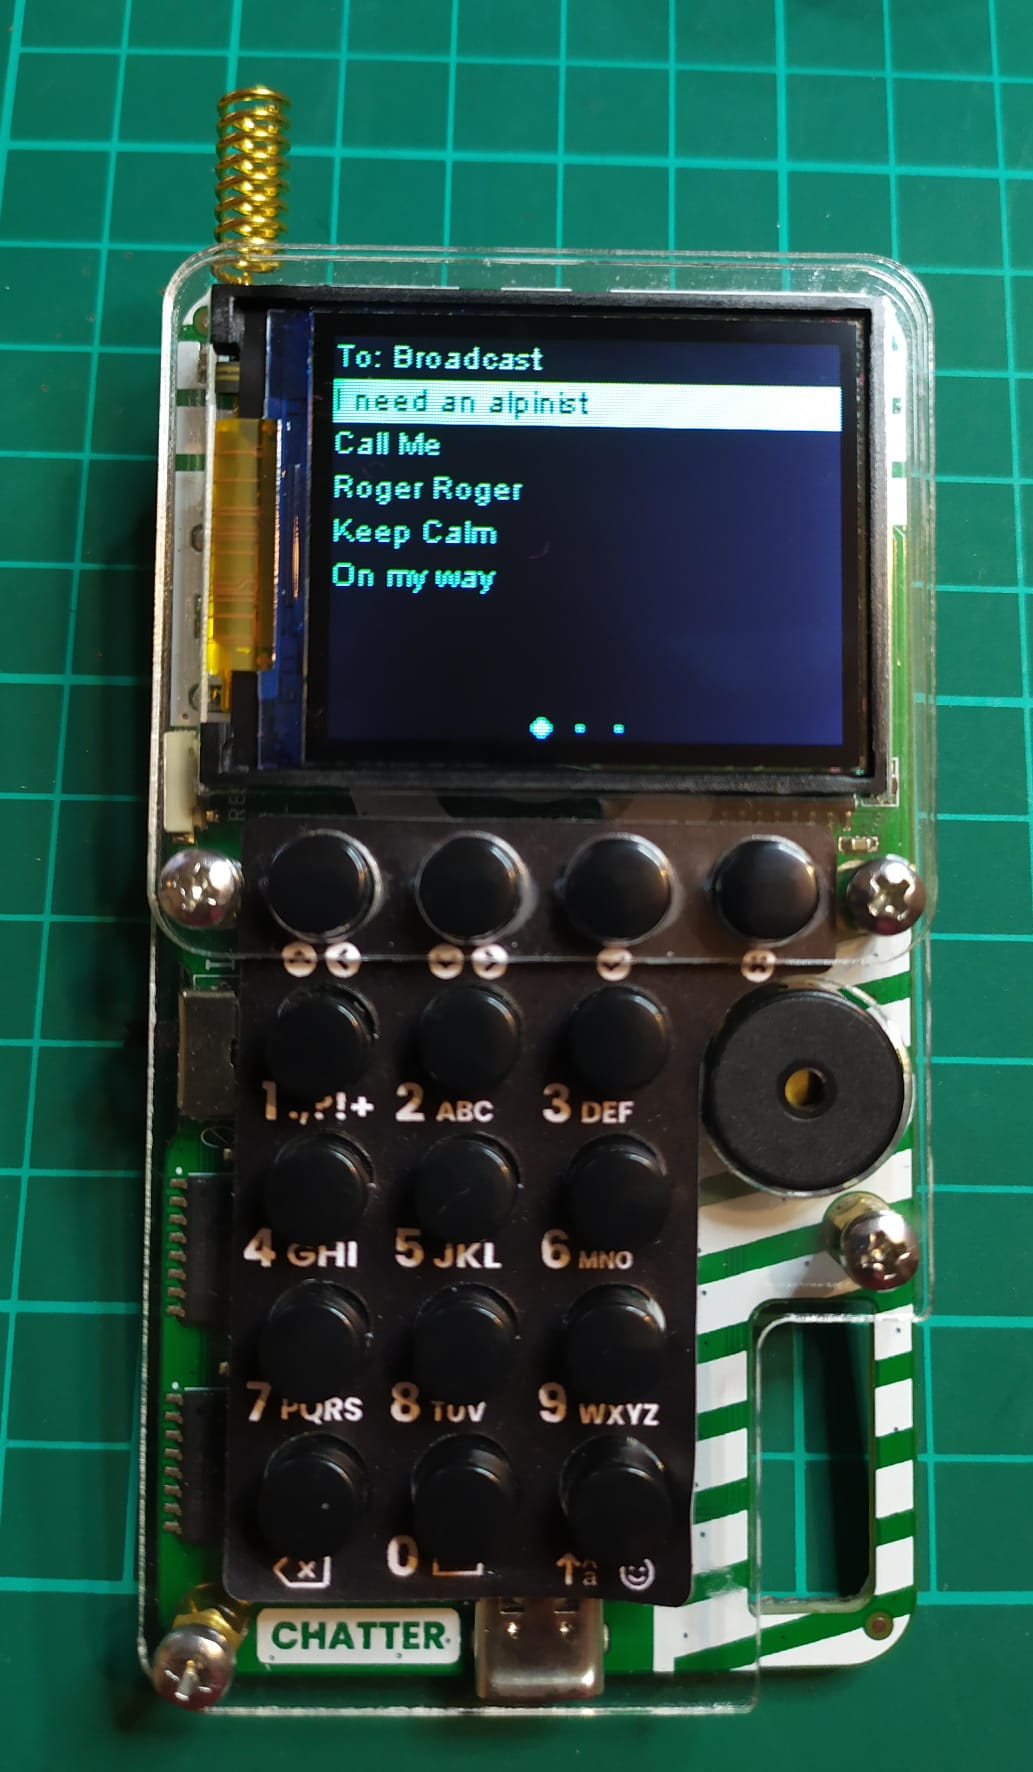
Using the python CLI (the smartphone app would also work) to set up some canned messages :
meshtastic --set-canned-message "I need an alpinist!|Call Me|Roger Roger|Keep Calm|On my way"The error message saying that “no messages are configured” disappears but we still can’t see the canned messages or send them.
Looking deeper in Meshtastic code, it actually makes sense, I am using RIGHT and LEFT events to select the message while Meshtastic is looking for UP and DOWN !
With that fix done, it works beautifully!
Beautifully is actually highly exaggerated, the keen eyes will have noticed there’s no debouncing, let’s fix that !
        // Get data from 74HC165
        byte shiftRegister1 = shiftIn(KB_DATA, KB_CLK, LSBFIRST);
        byte shiftRegister2 = shiftIn(KB_DATA, KB_CLK, LSBFIRST);

        keys = (shiftRegister1 << 8) + shiftRegister2;

        if (keys < prevKeys) { // a new key has been pressed (and not released), doesn't works for multiple presses at once but shouldn't be a limitation
            InputEvent e;
            e.inputEvent = meshtastic_ModuleConfig_CannedMessageConfig_InputEventChar_NONE;
            e.source = this->_originName;

            if (!(shiftRegister2 & (1 << 3))) {
                e.inputEvent = meshtastic_ModuleConfig_CannedMessageConfig_InputEventChar_UP;
            }
            else if (!(shiftRegister2 & (1 << 2))) {
                e.inputEvent = meshtastic_ModuleConfig_CannedMessageConfig_InputEventChar_DOWN;
            }

           ...

            if (e.inputEvent != meshtastic_ModuleConfig_CannedMessageConfig_InputEventChar_NONE) {
                this->notifyObservers(&e);
            }
        }
        prevKeys = keys;
Now, whenever the key input function is called, we check that
(shiftRegister1 << 8) + shiftRegister2is smaller than last call. Since a key press change a bit in this number from 1 to 0, this is a good way to check a new key is being pressed (checking for key != prevKeys would have been enough) AND it is a press event and not a release (otherwise one bit would be a 0 in prevKeys and a 1 in Keys).
Now, lets try to add free text input !
Adding this kind of else if to the key detection if condition works.
            else if (!(shiftRegister1 & (1 << 3))) {
                e.inputEvent = ANYKEY;
                e.kbchar = char('A');
            }
It immediately a new screen where free text input is possible in place of the selectable message list.
That’s good but it won’t be enough in our case. The input scheme is a bit more complex since the actual character we want to appear on the screen depends not only on the key pressed but also on how many times it’s been pressed in a quick succession and how many times the SHIFT key has been pressed before.
Those two conditions are going to complexify quite a bit our text input function.
First, lets take some inspiration from the other Meshtastic supported keyboards code (namely kbMatrixBase here) and define a keymap for the Chatter keypad.
#if INPUTBROKER_SERIAL_TYPE == 1 // It's a Chatter
// 3 SHIFT level (lower case, upper case, numbers), up to 4 repeated presses, button number
unsigned char KeyMap[3][4][10]=  {{{'.','a','d','g','j','m','p','t','w',' '},
                                   {',','b','e','h','k','n','q','u','x',' '},
                                   {'?','c','f','i','l','o','r','v','y',' '},
                                   {'1','2','3','4','5','6','s','8','z',' '}},  // low case
                                  {{'!','A','D','G','J','M','P','T','W',' '},
                                   {'+','B','E','H','K','N','Q','U','X',' '},
                                   {'-','C','F','I','L','O','R','V','Y',' '},
                                   {'1','2','3','4','5','6','S','8','Z',' '}},  // upper case
                                  {{'1','2','3','4','5','6','7','8','9','0'},
                                   {'1','2','3','4','5','6','7','8','9','0'},
                                   {'1','2','3','4','5','6','7','8','9','0'},
                                   {'1','2','3','4','5','6','7','8','9','0'}}}; // numbers

#endif
Since the Chatter keypad is (for now) the only serial keypad supported, let’s assign it the INPUTBROKER_SERIAL_TYPE 1.
Using the table above, we can then assign a “Button number“ to each key based on the order of the keys in the KeyMap array we just defined.
            // TEXT INPUT EVENT
            else if (!(shiftRegister1 & (1 << 4))) {
                keyPressed = 0;
            }
            else if (!(shiftRegister1 & (1 << 3))) {
                keyPressed = 1;
            }
            else if (!(shiftRegister1 & (2 << 4))) {
                keyPressed = 2;
            }
            else if (!(shiftRegister1 & (1 << 5))) {
                keyPressed = 3;
            }
            else if (!(shiftRegister1 & (1 << 2))) {
                keyPressed = 4;
            }
            ...
            ...
            ...
            // BACKSPACE
            else if (!(shiftRegister2 & (1 << 7))) {
                e.inputEvent = meshtastic_ModuleConfig_CannedMessageConfig_InputEventChar_BACK;
            }
            // SHIFT
            else if (!(shiftRegister2 & (2 << 7))) {
                keyPressed = 10;
            }
We can also immediately take care of the BACKSPACE key and add a special condition for the SHIFT key.
Actually, the BACKSPACE key doesn’t work with just the inputEvent specified.
Getting more inspiration from kbMatrixBase, it seems specifying the kbchar attribute is also necessary.
e.kbchar = 0x08;Let’s also add a few more attribute to the SerialKeyboard class in the header file
class SerialKeyboard : public Observable<const InputEvent *>, public concurrency::OSThread
{
  public:
    explicit SerialKeyboard(const char *name);

  protected:
    virtual int32_t runOnce() override;

  private:
    const char *_originName;
    bool firstTime = 1;
    int prevKeys = 0;
    int keys = 0;
    int shift = 0;
    int keyPressed = 13;
    int lastKeyPressed = 13;
    int quickPress = 0;
    unsigned long lastPressTime = 0;
};
Now, lets transform the keypresses into valid inputEvent by specifying a kbchar
            if (keyPressed < 10){
                e.inputEvent = ANYKEY;
                e.kbchar = char(KeyMap[shift][quickPress][keyPressed]);
                keyPressed = 13;
            }
It works but we can only write the first letter accessible on each key.
Detecting if a key is pressed successfully in quick succession isn’t too hard :
            if (keyPressed < 10){
                if (keyPressed == lastKeyPressed && millis()-lastPressTime < 500){
                    quickPress += 1;
                    if (quickPress > 4){
                        quickPress = 0;
                    }
                }
                if (quickPress > 0){
                    erase();
                }
                e.inputEvent = ANYKEY;
                e.kbchar = char(KeyMap[shift][quickPress][keyPressed]);
                lastPressTime = millis();
                lastKeyPressed = keyPressed;
                keyPressed = 13;
            }
Since the first time the key is pressed we display the first letter assigned to the key and we want to replace it on the second press then replace it again on the third press and so on, we can define an erase function :
void SerialKeyboard::erase(){
    InputEvent e;
    e.inputEvent = meshtastic_ModuleConfig_CannedMessageConfig_InputEventChar_BACK;
    e.kbchar = 0x08;
    e.source = this->_originName;
    this->notifyObservers(&e);
}
Also we need to reset quickPressin case no key is pressed for more than 500ms
        if (millis()-lastPressTime > 500){
            quickPress = 0;
        }
And it works quite nicely :
Now, we just need to add the shift key support and the keypad will be feature complete !
Given the current structure of the code, it’s not too hard:
            if (keyPressed < 11){
                if (keyPressed == lastKeyPressed && millis()-lastPressTime < 500){
                    quickPress += 1;
                    if (quickPress > 4){
                        quickPress = 0;
                    }
                }
                if (keyPressed < 10){ // if it's a letter
                    if (quickPress > 0){
                        erase();
                    }
                    e.inputEvent = ANYKEY;
                    e.kbchar = char(KeyMap[shift][quickPress][keyPressed]);
                }
                else { //then it's shift
                    shift += 1;
                    if (shift > 3){
                        shift = 0;
                    }
                }
                lastPressTime = millis();
                lastKeyPressed = keyPressed;
                keyPressed = 13;
            }
And …. VOILA !!
It Just Works !
I can write and send messaged to my other Chatter (or any node) using the on board keypad !
It wasn’t too hard but it still feels good to finish something, whatever the difficulty. Also, It still took me about two weeks of my scare project time so I’m glad it works !
That being said, it’s not over till it’s merged and last I checked, Meshtastic master was not compatible anymore with my device (actually all old ESP32 devices, not the newer S3, C3).
Looking at the commit history of the last few days, a fix has been mrged and linked in the issue I mentioned the problem

Pulling the latest master, compiling and flashing on my Chatter, I’m greeted by the now familiar boot bip and Meshtastic home screen !
It’s amazing, while I was adding keypad support, other were fixing the bug that was preventing me to commit !
So I forked the repo, created a branch and pushed my changes to it
Then I opened a pull request and submitted it for review by the maintainers :
A few minutes later, all the CI checks passed:

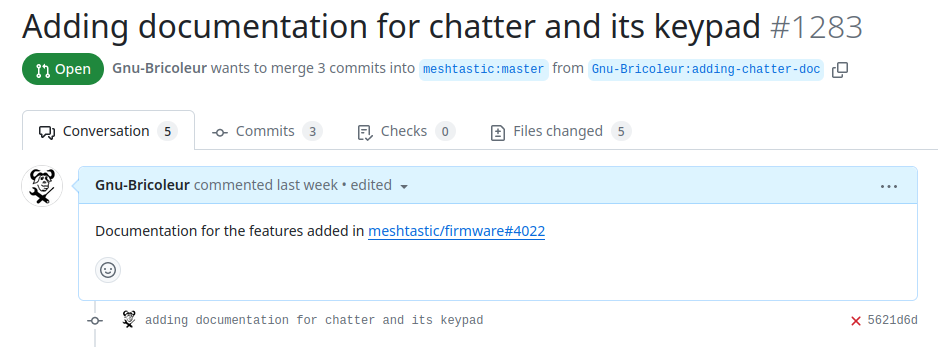
I legitimately thought I was done when :
Obviously, they are right, documentation is important 🙃
Let’s see how Meshtastic documentation is managed !
It turns out it requires pnpm (already installed when I tried (and failed) to fix the web configuration UI) and that’s all, great !
So I forked, cloned, then installed the dependencies with
pnpm iAnd started a development server
pnpm startThen it’s as simple as copying pasting the files from another supported hardware, modifying them to expose all the relevant informations about the Chatter device, adding some pictures, and publishing the merge request:
Once merged (should be the case when this page goes public), the Chatter documentation is now available here : https://meshtastic.org/docs/hardware/devices/chatter/
Done ! 😁
Except, it didn’t end here 😅
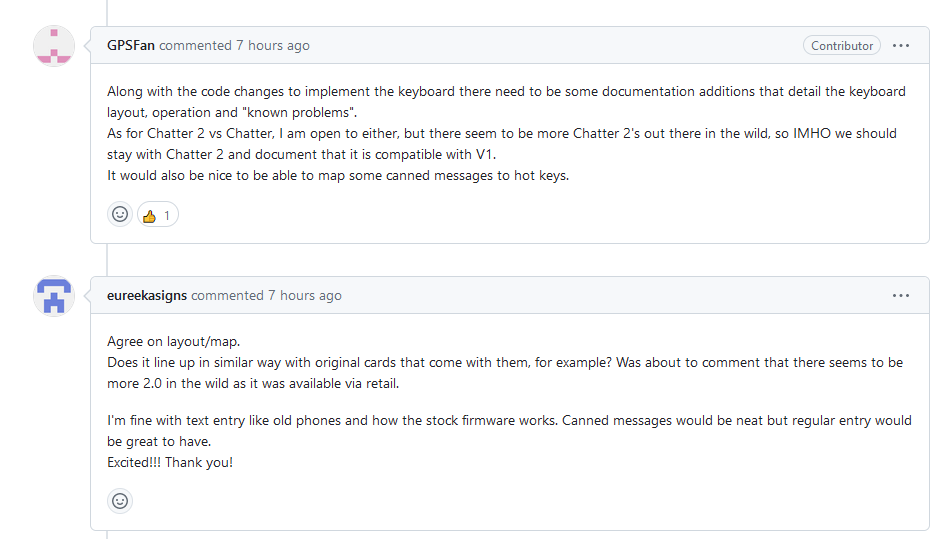
On the main firmware merge request discussion thread, someone tested the code and made a really good point:
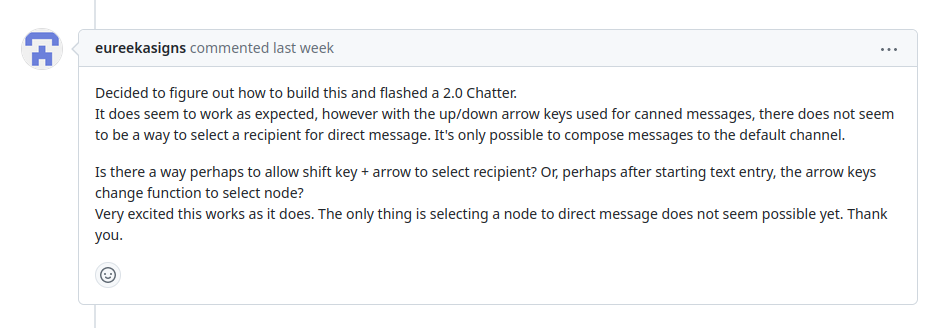
The Chatter being more or less my first hands on experience with Meshtastic, I completely missed that point.
While I noticed that there was a default recipient called broadcast, I didn’t found a way to change it and thought Meshatstic was probably working like a talkie walkie, nevermind the fact I already sent private messages in between my nodes 🤦♂️, I didn’t think twice.
Be it the motivation dwindling or the actual lack of time, adding this last feature, took me a week.
It wasn’t really complicated in the end, looking at other devices keyboard support, one more key is necessary to select the destination field, the TAB key.
Then cycling through recipients requires RIGHT/LEFT keys.
Since UP/DOWN share the function of cycling through the preregistered canned messages, and we are lacking free keys for the recipient selection feature, let’s remove this redundancy and only keep the UP key and reassigned the DOWN key to the RIGHT function.
With no other free key available to map the TAB function, I put on the BACKSPACE button when SHIFT has been pressed once.
            // BACKSPACE or TAB
            else if (!(shiftRegister1 & (1 << 7))) {
                if (shift == 0 || shift ==2){ // BACKSPACE
                    e.inputEvent = meshtastic_ModuleConfig_CannedMessageConfig_InputEventChar_BACK;
                    e.kbchar = 0x08;
                } else { // shift = 1 => TAB
                    e.inputEvent = ANYKEY;
                    e.kbchar = 0x09;
                }
            }
While writing the documentation and testing a bit more the code, I noticed an error slipped in the SHIFT handling logic, four levels of SHIFT were possible while only three were supported.
                else { //then it's shift
                    shift += 1;
                    if (shift > 2){ // NOT 3 HERE !!
                        shift = 0;
                    }
                }
I then updated the doc to reflect those changes and mention how to change the recipient and I think I’m done for real now ! 😁
What now ?
As I said in the beginning, I’m just starting out with Meshtatic, if whatever project I’m doing with this network ever turns into something meaningful, it’ll be a fun way to show off and doing range testing.
In the meantime it’s a good motivation to set-up a clean permanent base station at my home and maybe one at work.
If at some time I really start using the Chatter for anything serious, then I don’t think I can skip the following mods:
Replace the Lora module with the more serious Heltec RA-62
Add a proper antenna
Make it battery powered
Wire the wake-up button
Add a notification led
Add a GPS
Build a proper case for it
It could also be fun to design a small open hardware Keypad PCB (with GPS, wake up button and notification led) since the current Keyboard/Keypad offering for Meshtastic modules seems rather lacking at the moment. It could be using nicer switches (the stock one on the Chatter are terrible for typing messages), have a more natural layout and could also be plugged into my other Meshtatic boards
After so many modifications, the Chatter would basically be a whole new beast (although crippled by it’s old ESP32-WROOM core, you can guess where it’s going …)
There’s also this web configuration UI bug I encountered I could try to fix …
In the interest of actually finishing something and keeping this side project a side project, I’ll stop there 😁
I hope this was an enjoyable read, I’ve been wanting to document my projects for a while now and made several attempts but my main difficulty was finding the motivation to dive back into a finished project and retrace the thought process to write a summary.
This article might seem a bit more convoluted or tedious than necessary but it was written it as I was doing the things.
It wasn’t probably too bad if you made it this far !
I’ll be happy to help if you encounter difficulties trying to use Meshtastic, feel free to get in touch via the Meshastic forums, the Github issues or shoot me a line at: ————-
Huge thanks to GPSFan on Github for doing most of the work to port Mestastic to the Chatter !